Tuesday, March 29, 2011

#5 - Attack Methodology

There are a few schools of thought when it comes to attack methodologies—the plan of attack that a hacker adopts when it comes to penetration testing a network. There are a few variances here and there but most people agree that a good methodology to adopt involves more or less five (5) steps:
  • Reconaissance
  • Scanning and Enumeration
  • Gaining Access (and Escalation of Privileges)
  • Maintaining Access
  • Covering Your Tracks
The preceding steps are the official attack methodology proposed by the EC-Council in its Certified Ethical Hacker (CEH) certification. For the purpose of the rest of the lessons, we'll stick to these steps, unless something else comes along.

Let's look at these steps a little more in-depth:
RECONNAISSANCE
Reconnaissance is the act of gathering information. An attacker will attempt to gather as much information about a target (a company, a web site, or a platform) as they can. This reconnaissance can be either passive or active. For instance, an attacker wanting to gather information passively might perform some extremely thorough and pointed internet searches to find out as much as possible about a company. They might try to find Organization Charts, personnel listings, contact information.
BackTrack has some excellent reconnaissance tools built into it and we'll discuss them more in-depth in the next lesson. Also, we'll discuss a few tools that I think happen to do excellent jobs in the passive act of reconnaissance.
When we discuss active reconnaissance, however, we're typically speaking about an attacker who is scanning ports or services in order to obtain more in-depth knowledge about his victim. Walking along firewall rules and dumpster diving are other examples of this kind of reconnaissance.
SCANNING AND ENUMERATION
Utilizing port scanners, vulnerability scanners and performing war dialing are all examples of what an attacker would use to accomplish this task. We're going to focus a lot of our time on nmap and nessus during these lessons but we'll determine if there are any other scanning tools that help perform these tasks better.
GAINING ACCESS (AND ESCALATION OF PRIVILEGES)
This step in an attack methodology is where the actual hack or attack takes place. The attacker launches some sort of attack against a service, a port, a login, etc. and is able to gain access to the system.
MAINTAINING ACCESS
Once an attacker penetrates a system, they will most likely want to return for future use and they'll want to make sure that the system is easier to gain access next time. This is performed through the use of tools like rootkits and Trojan Horses that leave backdoors into systems.
COVERING YOUR TRACKS
Once you have implemented an attack, taken control of a box and left yourself a backdoor to enter any time you like, you need to cover your tracks and hide all signs you were ever there. This includes emptying of logs and wiping of system data.
SUMMARY
All right. Now that we've determined what steps make up our attack methodology, let's take an in-depth look at Reconnaissance.
Monday, March 28, 2011

#4 - Other Essential Peripherals

We've discussed our laptop and how to install BackTrack, a Linux-based operating system that's geared towards Penetration Testing. Also this past week, we've discussed which wireless card best presents us with an easy, plug-and-play experience when it comes to working with BackTrack and the aircrack-ng suite.


Now, we're going to take a look at the other components of our Essential Toolkit. We're going to need the following extra tools:
  • A Network Hub (for sniffing wired networks with Wireshark)
  • A USB Bluetooth Adapter
  • Two or Three USB flash drives
  • Two or Three Ethernet cables
So, Bertha is all dressed up for a night on the town with a nice, sleek, black number called BackTrack. Now it's time to accesorize her with a few nice baubles.

THE NETWORK HUB
There are plenty of devices out there that say they're a network hub. However, if you look carefully at how they actually work, the devices are not network hubs. They act like network switches. 
What's the difference you ask?
I'm glad you asked. Every good hacker should know the difference between switches and hubs.
HUBS vs SWITCHES
Hubs are dumb network devices. Hubs take data in and send it back out to every single port on the device. They do not sort the data coming in or going out in any way. Switches do. Switches remember which MAC addresses are connected to which port and ONLY SEND THE DATA MEANT FOR THAT MAC ADDRESS TO THAT PORT. This ensures a much more efficient network environment.
But what we want for network traffic sniffing is not what a switch offers us. A switched environment defeats us, the hacker, from network traffic sniffing.
Think about it for a moment. If we're sniffing network traffic, we want ALL the traffic, not just the traffic meant for us. A switch will only send us the data we are MEANT to have. So what do we do? We hook a network hub up at a central location, and we plug our laptop (remember Bertha?) up to the hub.
So, in order to do this, we must equip our Toolkit with a network hub. But we've got to be careful when making our decision. A lot of network devices out there claim to be hubs, but are, in fact, switches.
There's a reference sheet located on Wireshark's web site that lists out suggested hubs for you. Personally, my Toolkit already contains a hub. But if I were in the market today to get a hub, I'd first peruse the HubReference at Wireshark's web site (that you can find here: http://wiki.wireshark.org/HubReference ) and I would probably compare prices before buying.
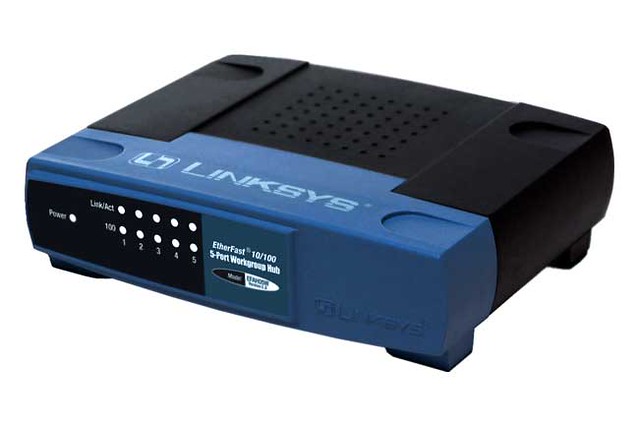
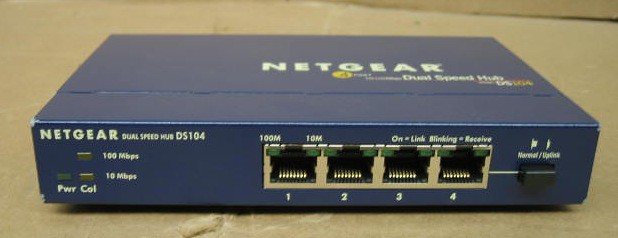
For my money, the Linksys EFAH05W 5-Port 10/100 Workgroup Hub looks to be best, coming in around $40-$45 and can still be found new. While the Netgear DS104 is a good, solid, reliable network hub that can be found used for about $100. Depending on your circumstances and what you can find on the 'net, you should be fine with either hub.

Linksys EFAH05WNetgear DS104
A USB BLUETOOTH ADAPTER
One of the more interesting tasks that a Penetration Tester will have before them is to perform either Bluetooth “eavesdropping” or “remote administration” of a Bluetooth device.
In order for us to perform these tasks, we need some software tools and a Bluetooth adapter to run that software through.
Now, you could just do a search through Amazon.com and pick yourself up any USB Bluetooth adapter and you'd be able to perform any of the lessons we are going to run through for Bluetooth.
However, if you were to do that, you'd miss out on one of the more fundamental lessons of hacking: the actual tearing apart and putting back together better than the original configuration.
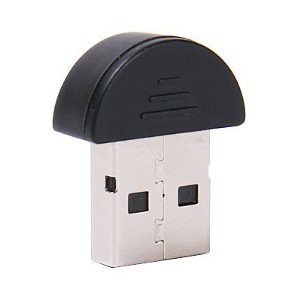
When I was looking for a USB Bluetooth adapter, I ended up finding a handful of them available for about $2.99 and I picked up 3 for the exact purpose of tearing the plastic dongle apart. Bluetooth, after all, is a radio technology and what's the ability to eavesdrop on a Bluetooth conversation without giving yourself the ability to do so from some decent yardage? So, I'm planning on showing how to take a USB Bluetooth adapter apart and solder on an antenna to allow for better distance.
So, definitely go for something that looks like this:


Rather than this:


THE REST
Grab yourself a couple of Ethernet cables (you'll need three for proper sniffing) and grab yourself a couple of USB flash drives, you may need them for files you find while snooping around networks.
That's about it, folks. Our Essential Hacker's Toolkit is just about complete. There may be other components we'll add in here and there but for the most part, our kit is ready and now it's time to start hacking!
First, we're going to take a look at the overall methodology of running a Penetration Test and then we'll start to get into the nuts and bolts.

Saturday, March 26, 2011

#3 - Wireless Cards for Penetration Testing

Previously, we discussed a quick short list of wireless chipsets to research in order to best handle packet injection. And packet injection, my friends, is what it's all about. Our main goal, when dealing with wireless, is being able to inject enough packets into the stream in order to generate the information we need to break the encryption key. We'll discuss this in depth later on. For now, we need to select an affordable card that can handle three main key elements of wireless sniffing:

  1. The cards need to be able to handle the spectrum of frequencies we want to monitor: 802.11B, 802.11G and 802.11N. There are other types of wireless in use today, but these are the three main types of wireless you find “out in the wild”.
  2. The cards must be able to be placed into “monitor mode”, the ability of a card to “listen” to a network, rather than just “speak” to it.
  3. The cards must be able to handle “packet injection”, the ability to inject packets, thus creating enough viable packets for us to crack WEP encryption
So, our short list of viable cards included:
  • Atheros (AR5XXX, AR9XXX)
  • Broadcom (B43XX Family)
  • Intel Pro Wireless and Intel Wifi Link (Centrino)
  • Ralink (RT2X00)
  • Realtek (RTL8187)

If you were to purchase a brand-new laptop and were able to do a little research prior to purchase, you  might find that your internal wireless card actually has one of those chipsets on board. The ASUS K52F that I use for writing, email and other boring technical activities has an atheros-based wireless card. What does this mean? Well, I can do any of the tips and tricks we'll discuss later on on my shiny ASUS laptop. For just starting out and just for learning, this is a fine thing. If you were lucky enough to purchase a new laptop for learning how to do Penetration Testing, then I would recommend you start out with a card like this. All the exercises we'll go through later will be just as applicable.

However, if you're putting together your Essential Toolkit, already have a laptop that doesn't have a wireless card or you're serious about doing wireless surveillance, you're eventually going to want to get a wireless card with one of these chipsets AND an external antenna connector. Why? Well, there are lots of applications for a wireless card with an external antenna. Some hackers have been able to hook them up to powerful antennae, potato chip cans, and even old satellite dishes (you know, for Satellite Dish Cable in your home) to gain some absolutely wonderful distance on their surveillance. You, too, will probably eventually want to tinker with applications like this. So I think it would be best to add a USB wireless card (with an external antenna connector) to your Essential Toolkit.

Let's discuss this a bit.

I've done quite a bit of research and the cards that I find give you the best bang for the buck is a pair of cards from a company called 'Alfa Network'. They have 2 cards that are inexpensive and use the Ralink chipset. There are two models that are most prevalent.

  • Alfa AWUS036NEH – 1000mW USB Wifi Adapter (with threaded RP-SMA) Antenna Jack
  • Alfa AWUS036H – 2000mW USB Wireless Adapter (with threaded RP-SMA) Antenna Jack

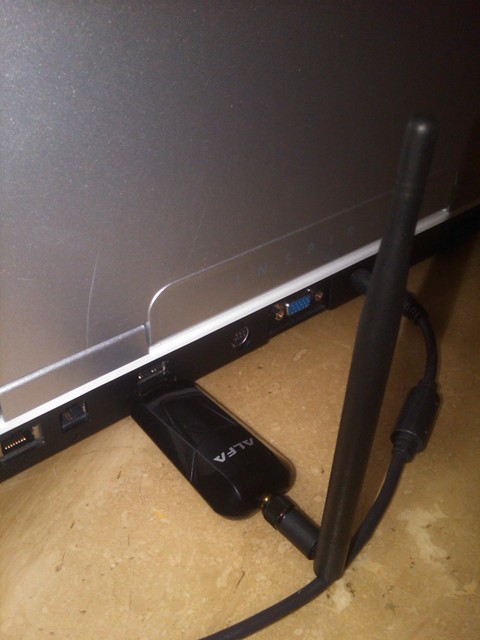
RP-SMA, for those of you who don't know, designates the kind of threaded adapter that you can screw on. For our purposes, this connector for the antenna is just fine. You can see it very clearly in the top right picture shown here:


So, you've got a the 36NEH which is slightly less powerful than the 36H. They both handle 802.11 B/G/and N, so you get the best coverage for wireless networks. And here's the kicker: the 2000mW version comes in at approximately $30 + shipping while the 1000mW version (which, frankly is just as useful as the 2000mW version) can be had for a stunningly low $20.

You can pick up either of these cards through a number of places, if you use Google's Shopping site. Amazon carries them and a few others. However, I picked up my AWUS036NEH at Data Alliance (http://www.data-alliance.net/-strse-61/alfa-500mW-USB-Wireless/Detail.bok) but you could also pick up the 2000mW version from them here: http://www.data-alliance.net/-strse-158/Alfa-AWUS036NH-2000mW-1000mW/Detail.bok

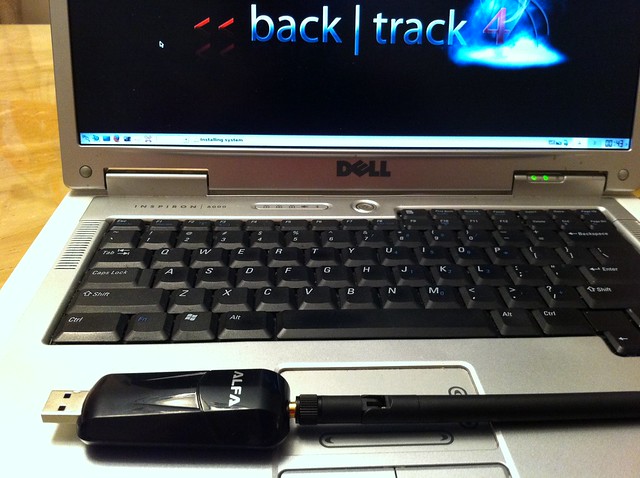
The reason I decided to spend the $20 on an external USB wireless card is because of the ease of use when it comes to getting things working in BackTrack. Here's my $20 Alfa AWUS036NEH:


The Ralink chipset in the AWUS036NEH works just this easy:

  1. Plug your wicked-looking Alfa card into the USB Port


  2. The kernel recognizes the hardware and you can verify this by running 'lsmod | grep -i 80211' to ensure that the RT modules were loaded up. You should see the RT2X00 module loaded in memory.


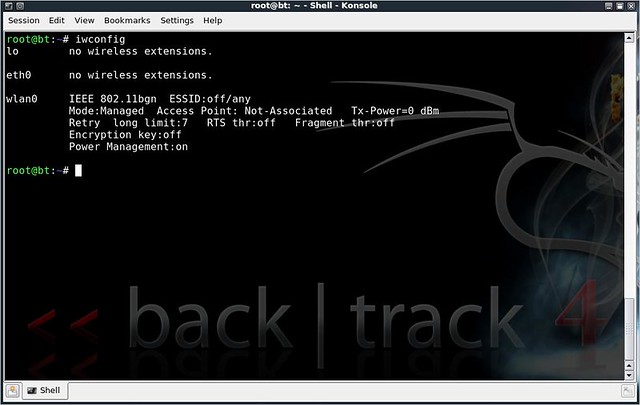
  3. Run 'iwconfig' to make sure the card is seen in the OS


  4. And to make sure your new wireless card can be put into monitor mode (and therefore, be an easy tool to crack WEP and other wireless tricks later), run 'airmon-ng start wlan0'.


Once that is run, if the right driver is loaded and all is well, you will see a message saying '(monitor mode enabled on mon0)' or something close to that. If you see monitor mode is enabled, you have the right card, the right drivers and everything's set for you to work wireless magic later on. If you don't see that, then you might need to do a little googling and find exactly what card, what chipset you have and see if there are any known issues with that card in the BackTrack forums.


For more information, you can check out the aircrack-ng website. They maintain a compatibility list that details wireless cards, chipsets and the like. You can find that compatibility list here: http://www.aircrack-ng.org/doku.php?id=compatibility_drivers . By perusing that list and doing a little bit of research, you may be able to find another card that best suits your needs. For me and for the lessons we'll be covering, I find the $20 Alfa card to be a best buy.

Just make sure, that if you decided to go with an external USB wireless card, you should always get one with an external antenna. This lets you have the most flexibility in your wireless sniffing. Once you get deeper into wireless sniffing and cracking, you'll be most disappointed by NOT having an external antenna.

Next up, we'll discuss the few small items we want to include in our Essential Toolkit and wrap up making our kit. Then we'll start to work out our penetration testing methodology.

Wednesday, March 23, 2011

#2 - Installing BackTrack Linux

In our last section, I detailed for you a late model (older but still
modern) laptop that would be good to use for our penetration testing
laptop.


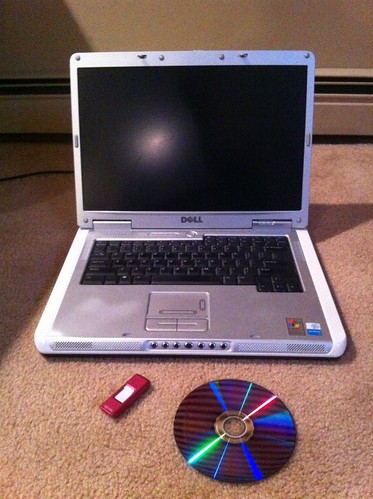
Behold, Bertha:


Bertha is a Dell Inspiron 6000 from 2005. She has a Pentium M for her CPU, has 320GB of PATA storage (I spent about $75 on the hard drive). She has an Ethernet port, 2 USB ports and a CD-ROM drive. Is she fancy? No. Her case is battered, scratched and, in places, she's faded. But, she will boot up and run Linux and that's more than what we need.


THE OPERATING SYSTEM
There are plenty of security tools out there, loose in the wild. There are Microsoft Windows-based tools, Apple OSX-based tools and Linux-based tools. For the purposes of these lessons, I’ve decided to focus on Linux-based tools. If some tool comes up that is better at a particular purpose and is written for a different platform, we’ll address that then. But for now, for us to become thrifty, economical hackers, we’re going to focus on Linux-based tools. Linux is a free, open-source operating system that works on a broad spectrum of hardware. So, if you’re like me and using an older (but modern) piece of equipment, the chances that Linux will work on your hardware are pretty good.
There are plenty of security-minded distributions of Linux available and I recommend you play with as many as you like. However, for our purposes, we’re going to focus on BackTrack. BackTrack is a penetration testing distribution and it has a plethora of tools available for you, the hacker, to use to accomplish various tasks.
At the time of this writing, BackTrack 4 R2 is the latest available ISO you can download and it’s about 2GB so you’ll need to burn this image onto a DVD-ROM, as a CD-ROM will be too small (only 650Mb). You can obtain this ISO file
from: http://www.backtrack-linux.org/downloads/ directly or from a torrent. Once you have this downloaded, burn it to DVD using whatever DVD authoring software you have at your disposal.  I use Ubuntu Linux at home, so I use K3B to burn CD’s and DVD’s.

CHOOSING HOW TO INSTALL
There are several different ways to install BackTrack onto a machine. I’m going to focus on two main installs: 1) installing BackTrack on a Hard Disk and 2) installing BackTrack (persistently –keep my changes) on a USB Flash Drive
(Stick).
Whichever you choose is up to you. I just wanted to documented the two main ways to use BackTrack.

INSTALLING BACKTRACK ON A HARD DISK
First, ensure your laptop is plugged in or has enough juice to handle an hour or so of battery time. Second, follow these steps to easily install BackTrack onto your laptop’s hard drive.
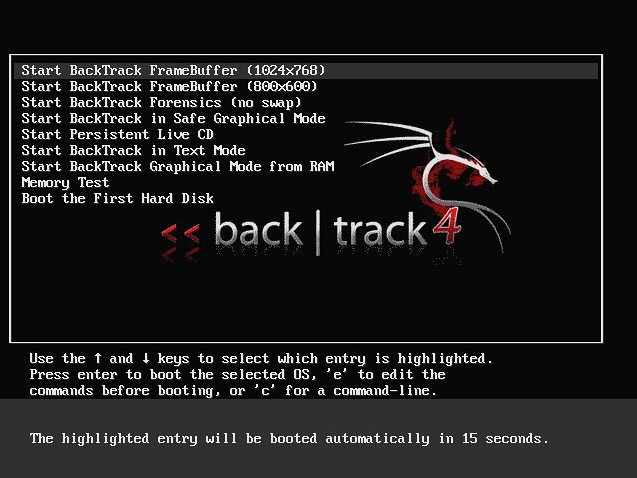
  1. Boot up off BackTrack DVD
If your equipment is fairly modern, choose the first menu item upon boot: “Start BackTrack FrameBuffer (1024x768)”. If your equipment isn’t so fairly modern, choose the 800x600 option (or even Safe Graphical Mode).


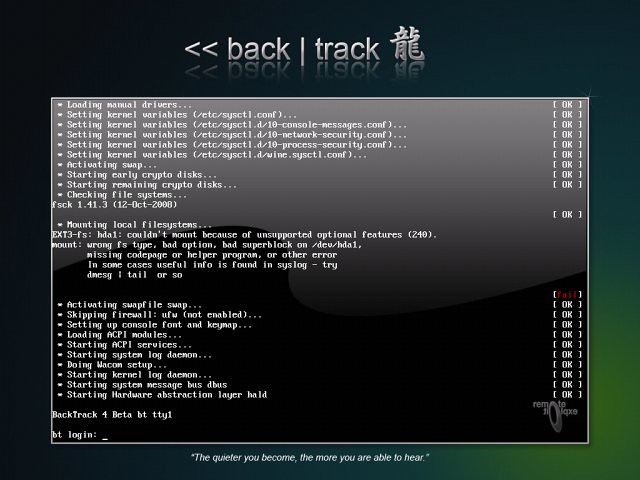
  1. Login to BackTrack
    You will eventually be presented with the login prompt for BackTrack.
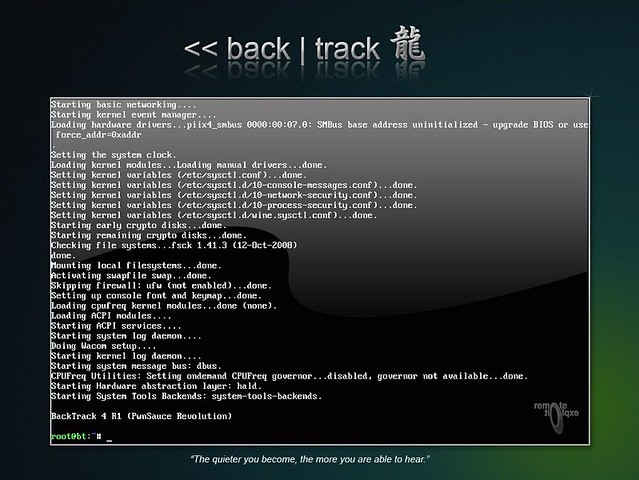
    Login with a username of ‘root’ and a password of ‘toor’.

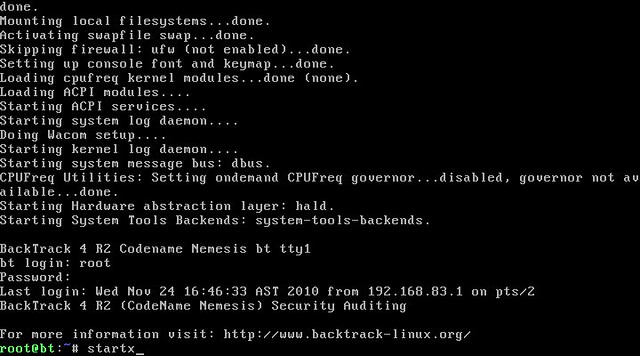
Which will then present you with a rather unassuming looking command prompt (like this).
BT-CMD-PROMPT.jpg


  1. Start GUI Desktop
    From this command prompt, you could run whatever commands you like.  However, most of us would prefer to work from a GUI environment, a desktop with icons. In order to fire up BackTrack’s GUI environment, type ‘startx’ (without the quotes) at this command prompt and hit the Enter key.
    bt-startx.jpg
     
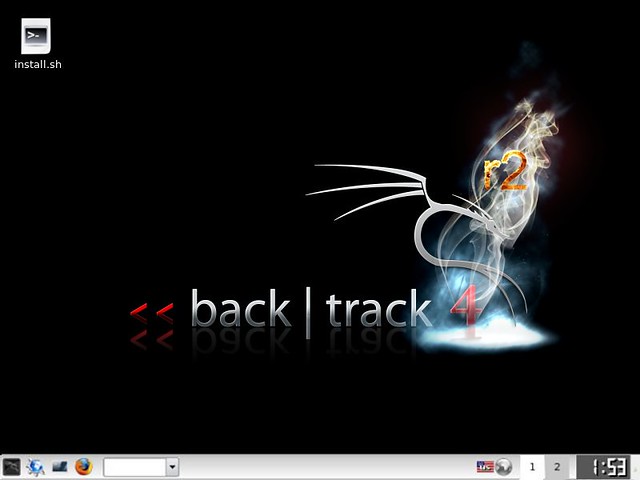
    This will fire up KDE and bring you to a desktop.
    backtrack4-desktop.jpg


  1. Run the ‘install.sh’ Script
    Once you’re on the BackTrack desktop, you can install BackTrack on your hard drive by double-clicking the ‘install.sh’ icon in the top right of the desktop. This will launch the ubiquity installer that has made Ubuntu installing such an easy task
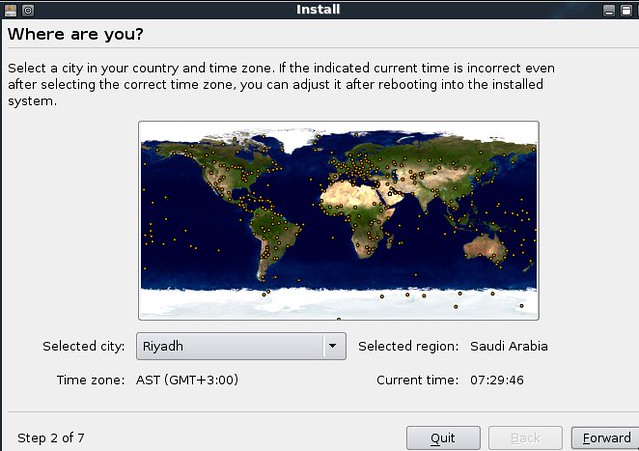
  1. First, ubiquity asks you what Time Zone you are in. Select your proper Time Zone.
ubiq-TimeZone.jpg


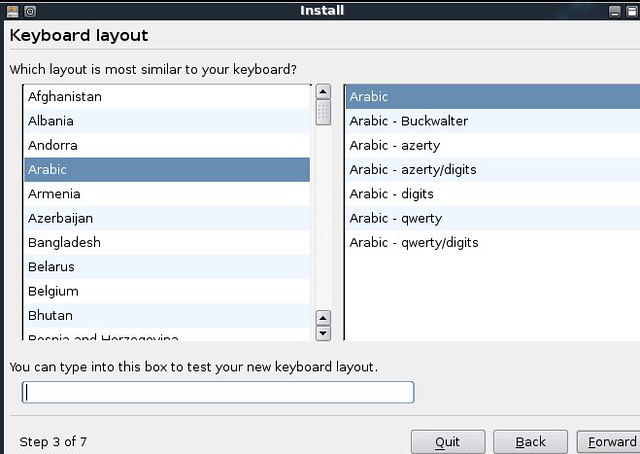
  1. Next, choose your keyboard layout.
ubiq-Keyboard.jpg


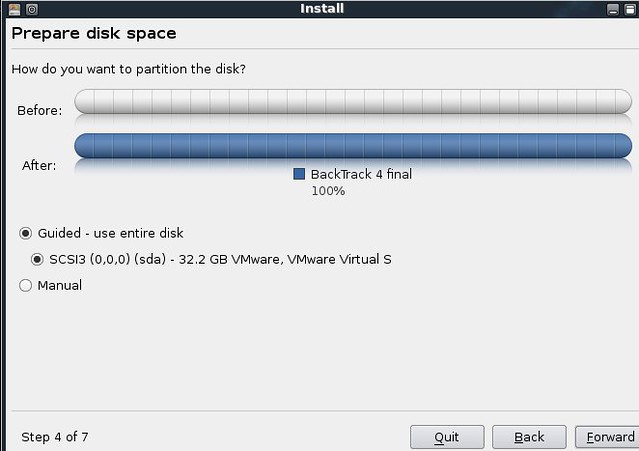
  1. Next, choose how you want to partition your drive. If you’re using the whole disk, your partitioning will look like this:
    ubiq-partition1.jpg

If you’re sharing your hard drive between Windows and BackTrack, you’re partitioning will look like this (an Ubuntu install is shown in the illustration):
032-ubuntu-partition-setup.jpg


  1. Next, ubiquity (the Linux installer) tells you it is ready to install. Click the ‘Install’ button and you’re ready to grab a coffee and kick your feet up.
    ubiq-install.jpg


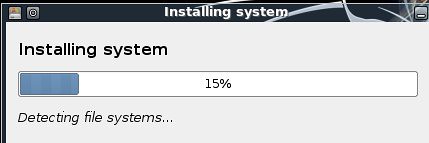
  2. During install, you’re presented with a progress bar such as this one.
    ubiq-progress-bar.jpg


  1. Eject the DVD and Reboot
    Once completed, you can eject your BackTrack DVD, restart your laptop and boot up into BackTrack on your hard drive.


INSTALLING BACKTRACK ON A USB DISK
There’s two main ways to install BackTrack onto a USB Disk: either use a Windows-based utility or a Linux-based utility to read in an ISO image of BackTrack (we downloaded it above) and write it to a USB Flash Drive. So, we have the Linux world and we have the Windows world. I’ll describe both below so all of us can enjoy BackTrack goodness on a USB drive (with persistence!).
INSTALLING BACKTRACK ON A USB DISK USING UBUNTU
  1. Installing “Startup Disk Creator”
Ubuntu comes with a utility built into it to write an ISO image to a USB disk. This utility is called “Startup Disk Creator” and you can install it (if it’s missing) by running the following command in ‘sudo’ mode.
sudo apt-get install usb-creator-common usb-creator-gtk
  1. Use “Startup Disk Creator”
Once you’ve got “Startup Disk Creator” installed, you can simply navigate to it by going to System > Administration > Startup Disk Creator
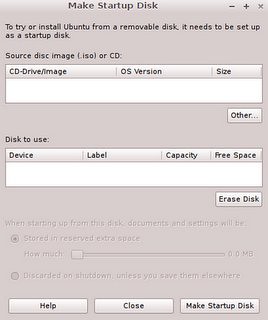
You will be presented with the following screen:
Ubuntu Startup Disk Creator.png
  1. Select the ISO media and the USB media.
Once you’re presented with this screen, you can use the ‘Other’ button to browse to the ISO you’ve downloaded for BackTrack and select the USB Flash Drive you would like to format with that ISO by using the middle section called ‘Disk to use:’.

  1. Make the Startup Disk
Click the ‘Make Startup Disk’ and your USB will be formatted and the BackTrack ISO will be written to the device to make a bootable USB disk that boots BackTrack.


INSTALLING BACKTRACK ON A USB DISK USING WINDOWS
  1. Download “Linux Live USB Creator”
There’s a freely available Windows-based utility called “Linux Live USB Creator” that you can download from http://www.linuxliveusb.com . This utility runs under Microsoft Windows and enables what is termed in the industry as “persistence” of data—meaning, this USB drive will not just act like a bootable CD where you can’t save any changes. It will, in fact, KEEP ALL YOUR DATA AND CHANGES. This is huge. We can make a USB stick our penetration testing environment.


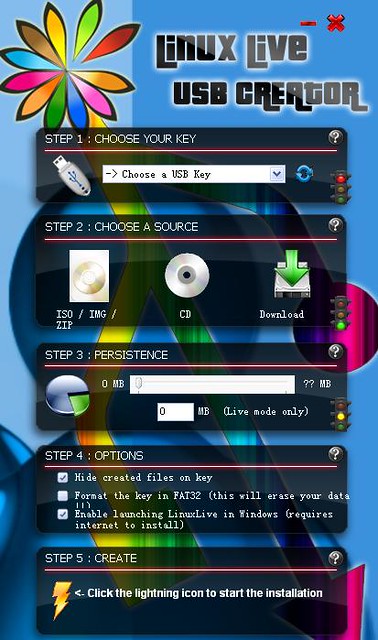
  1. Launch “LiLi” USB Creator

LiLiUSB_Creator.JPG


  1. Select the USB Key that you want to write the ISO to
  2. Choose the BackTrack ISO you want to write to the USB Drive
  3. Choose how big you want your persistant data to be (on an 8GB drive, I chose between 2-4GB)
  4. Last, Click the Lightning button to start the creation process
  5. In about an hour or so, you’ll have a USB Drive that boots BackTrack


SUMMARY
So, we’ve downloaded BackTrack, a Linux distribution focused on penetration testing. We’ve installed BackTrack (either on a laptop’s hard drive or on a USB drive with persistence). Next up, making sure our wireless card works and can be put into “Monitor Mode”. Our toolkit is started. Time to add to it a little.

Tuesday, March 22, 2011

#1 – Essential Frugal Hacker's Toolkit


INTRODUCTION


For those of you who don't know me, I'm a network security analyst and project manager. I lead a team of network security analysts whose job it is to perform vulnerability assessments for the Department of Defense and to perform penetration tests for some commercial customers. Not only do I lead my team and work the contracts/business side of the house, a lot of the time I find myself on the ground at testing sites, working side by side with my employees. I am a competent tester and a very technical person, so
when scheduling conflicts arise and my team can't cover testing completely, I step in and lend a hand. Previous to this gig, I worked as a UNIX administrator for nearly fifteen years and managed a 1500
workstation hospital's mixed-technology network. I know Windows. I know Linux. I know (some) Cisco. I know SQL. I've programmed web applications in Perl, Javascript and PHP.


Basically, I'm a technology hound. I like to know how things work and I don't stop researching until I
find a satisfactory answer.


But I'm not a celebrity chef. And I'm not Stephen King. I'm not rich. I live day to day on a budget. And
I'm guessing that if you are reading this, then you do, too. After all, not everyone is lucky enough to have a limitless cash flow. 


In essence, I have to hack on a dime budget. I tend to piece together my computers and I rarely pay for

software (I don't pirate, I simply don't buy Microsoft Windows, if, in fact, I don't need it). I like to keep my dollars where they belong—in my own wallet, not someone else's.


So, with a frugal wallet in mind, I've put together what I feel is an essential hacker's toolkit. I've

included in it a small array of hardware, some specialty, some not and I'm here to tell you from the get-go that there will, indeed, be holes in our toolkit. There are some tools that simply cost too much
to seriously think about including in a frugal hacker's toolkit. And, if I'm totally honest, there will probably be tools that pop up along the way that we'll simply add to our toolkit. (I mean, the chances
that I'll remember everything right at the time of writing are slim to none)


Since we're frugal (and not flat broke), we are going to spend a little money here and there.

However, what money we do spend, will be done for a reason: to easily get us results. Since we're hackers, we're lazy, right? And who really wants to sit and spin crucial cycles making a free/incredibly
cheap piece of hardware to work when we can spend a quick $30 and get that piece of hardware to work within a few minutes? I don't know about you, but I'll dish out a couple of bucks to save myself a headache and hack into a system faster.


So where do we start? Well, the following list is my starting point. Whenever I build a hacking toolkit, this is the checklist of equipment I usually pull together. Let's go over it, shall we?


THE
ESSENTIAL FRUGAL HACKER'S TOOLKIT

Here's what you're going to need to amass in your collection. I've been able to piece together most of
this kit from castoffs at my job. If you're job has an IT department, you might be able to get friendly with a tech and luck into a late model in the discard pile, as well. 

Let's start, shall we?

  1. A Late Model Laptop (Use the following specifications as a guideline. You can vary with any
    particular component, but try to stick close to the specs. You'll get the best experience if you keep the hardware modern—not necessarily new or the latest and greatest, just modern)
  • 80GB Hard Drive (or larger)
  • 1GB – 2GB RAM
  • CD/DVD ROM Drive (A writer is not
    necessary)
  • Built-In Wireless Card capable of
    being put into “monitor mode” (see below) OR
  • PCMCIA slot/USB slot for wireless
    card that can be put into “monitor mode”
  • Ethernet Cable Port
  • Multiple USB Ports
  1. A wireless card that is capable of being put into “monitor mode” (more on what “monitor
    mode” means later, but for now, stick to any wireless card that has the following chipsets built into it). Other than the actual laptop, this is where you want to spend some actual money. Not a lot
    of it, but some.
Wireless Chipsets to research:
  • Atheros (AR5XXX, AR9XXX)
  • Broadcom (B43XX Family)
  • Intel Pro Wireless and Intel Wifi
    Link (Centrino)
  • Ralink (RT2X00)
  • Realtek (RTL8187)

  1. Two or three Ethernet cables – you never know when things break
  2. A USB Bluetooth Adapter
  3. A small, inexpensive hub – we're going to use this for wired network sniffing
  4. Two or three USB flash drives (sticks are the most preferable option here: 4GB-8GB, nothing more)

Basically, to demonstrate to you that I'm practicing what I preach, I'll be piecing together my own kit and documenting it all along the way. So, throughout these lessons, you'll see what I see and you'll learn what I learn. This will be an in-depth look at penetration testing techniques, skills that you'll need to hack a network and the tools you can use to evaluate a given network's security.

Also, some essential reading that I think you'll find interesting is listed below. I'll be drawing from a lot of reference material and some of these books will contain in-depth data for us, as hackers.

ESSENTIAL READING
HACKING EXPOSED 6 by Stuart McClure, Joel Scambray, and George Kurtz
HACKING EXPOSED WIRELESS by Johnny Cache, Joshua Wright, and Vincent Liu
THE DATABASE HACKER'S HANDBOOK by David Litchfield, Chris Anley, John Heasman and Bill Grindlay
THE WEB APPLICATION HACKER'S HANDBOOK by Dafydd Stuttard and Marcus Pinto
OFFICIAL CERTIFIED ETHICAL HACKER REVIEW GUIDE By Steven DeFino, Barry Kaufman, Nick Valenteen and Larry Greenblatt
THE ART OF DECEPTION by Kevin Mitnick and William L. Simon
THE ART OF INTRUSION by Kevin Mitnick and William L. Simon