Recently, while performing some tasks for a customer, I was able to flex my information gathering skills quite a lot. The ensuing bit of investigation (which we’ll discuss more in-depth in the next post) led to me discovering that a customer’s main public-facing web server contained a remote file upload vulnerability and that an attacker could gain shell access to that server (behind their firewall) in a single easy step.
While it turned out this was very easy to investigate, identify the vulnerability and then exploit it, I realized that there aren’t a lot of tutorials out on the web to show in-depth or step-by-step what you can do with a remote file upload vulnerability.
In addition to the fact that in-depth tutorials are not plentiful, there seem to be very few instruction sets on where to find shells and what to do with them once you’ve determined you can gain access.
So, I set aside some time to put together a couple of tutorials over the next couple of weeks. The first scenario we’re going to deal with is an ASP.NET web application that has a remote file upload vulnerability. First, we’ll build a virtual machine to exploit and then, in the next couple of posts, we’ll exploit it and see what damage we can really do.
The reason I decided we were going to build a vulnerable virtual machine is because I have found numerous quick posts about how to exploit the vulnerability we’re going to showcase here and, unfortunately, they all have listed the Google Dorks (or web searches) you can use to find web servers that are vulnerable. While, I’m enough of a curious hacker to maybe play with one of these vulnerable servers while anonymized and connected to a Starbucks, I take some exception to this as “de facto” system of learning. If you’re going to want to learn how to exploit remote file uploads, standing up a virtual machine to play with accomplishes two things: a) you stay ethical (and that’s a good thing) and b) you can actually see what files are created, what logs are created, and what the residual damage is to the server, once you breach it. This, to me, helps reinforce the whole “hack to learn” mentality, then just finding someone else’s server to breach. Instead, you can take this example and learn from it so that maybe you see how a “defense-in-depth” approach helps fortify your server’s security.
Building the VM
The vulnerable web application we’re going to tinker with on this tutorial is dotnetnuke. It runs under ASP.NET, Microsoft SQL Server and Microsoft’s Web server, also known as IIS – Internet Information Services.
First, your best bet is to install Windows XP. The SP doesn’t matter because we’re not going to be penetrating this Virtual Machine at the OS level, we’re going to be attacking the web application stack.
Once you have Windows installed, you’re going to need to install Internet Information Services (IIS). In Windows XP, you can install IIS by inserting the XP CD, bringing up the “Add / Remove Programs” interface and choosing the “Add/Remove Windows Components” button on the left-hand side of the screen.
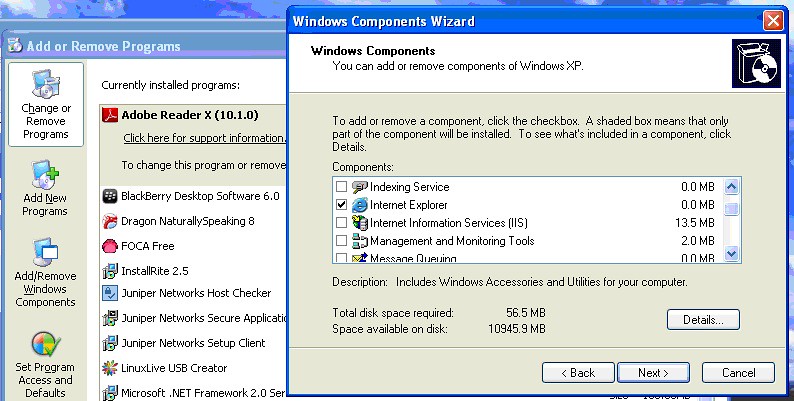
This will invoke the “Windows Components Wizard”. In this wizard, you should check off the checkbox next to “Internet Information Services (IIS)” and click the “Next” button. This will walk you through installing IIS on Windows XP.

Once you’ve completed installing IIS, you should be able to open a web browser on the XP box and navigate to http://localhost and you should see web pages that look similar to these:
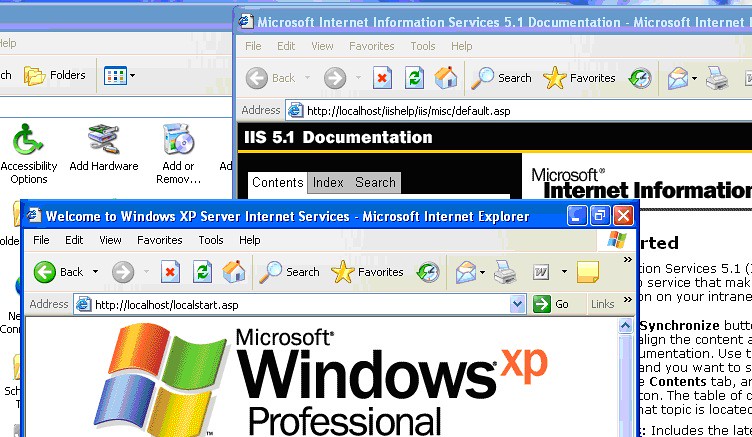
Congratulations! You’ve now got a web server answering on your Windows XP machine.
Now, the next thing we’ve got to do is make sure the Windows XP Firewall is configured to pass data through the firewall to the IIS server.
Windows XP Firewall
If you’re running a version of Windows XP that has the Windows Firewall as part of its application suite, then you’ll need to change its configuration (post IIS install) to allow Web Server traffic through the firewall. The easiest way to do this is by opening the “Windows Firewall” dialog from Windows XP’s “Control Panel”.
Clicking on the “Advanced” tab brings you to the “Network Connection Settings” setion.

Check the checkbox next to the network connection that is applicable (default is “Local Area Connection” in Virtual Machines, but this can vary from machine to machine) and click the “Settings” button.

By checking the checkbox next to “Web Server (HTTP)”, you’ll allow an exception through the firewall for all HTTP traffic. And for our purposes, HTTP (port 80) traffic is sufficient. Click “OK” and exit out of the “Windows Firewall” configuration screens.
Next, we’ll need to install ASP.NET on our Windows XP box.
Installing ASP.NET on Windows XP
There are a multitude of ways of installing ASP.NET on your Windows XP machine. The most modern technique is navigating a web browser to www.asp.net and installing the Microsoft Web Platform Installer. This will eventually get you ASP.NET installed, as well as some Visual Studio components. (NOTE: the web site states it only supports Windows XP SP3+, so if you’re running a lower version, this is not the way to go.)
If you want, please go ahead and follow the instructions on that web site to install the latest version of ASP.NET (at the time of this writing, the most current version available on their sites is 4.5).
However, since the end goal of this exercise is to build a vulnerable virtual machine, it is perfectly acceptable for us to do something a tad bit easier and maybe a little less secure than we would ordinarily like: you could install a version of ASP.NET that’s already on your Windows XP machine.
By opening a command prompt and navigating to the Microsoft .NET Windows directory, “C:\Windows\Microsoft.NET\Framework\v2.0.50727”, you will find two (2) executables that you can run from the command line, in order to install ASP.NET:
aspnet_regiis –i and aspnet_regiis –c

This will register and install an older version of ASP.NET on your machine. For this exercise, though, that is fine. We are not building a machine for the purpose of hosting a real web application (where we may want the latest and greatest software). We are trying to build a vulnerable machine and there’s no need for engineering this machine for greatness.
Installing SQL Express
Download SQL Server 2005 Express from http://www.microsoft.com/en-us/download/details.aspx?id=21844
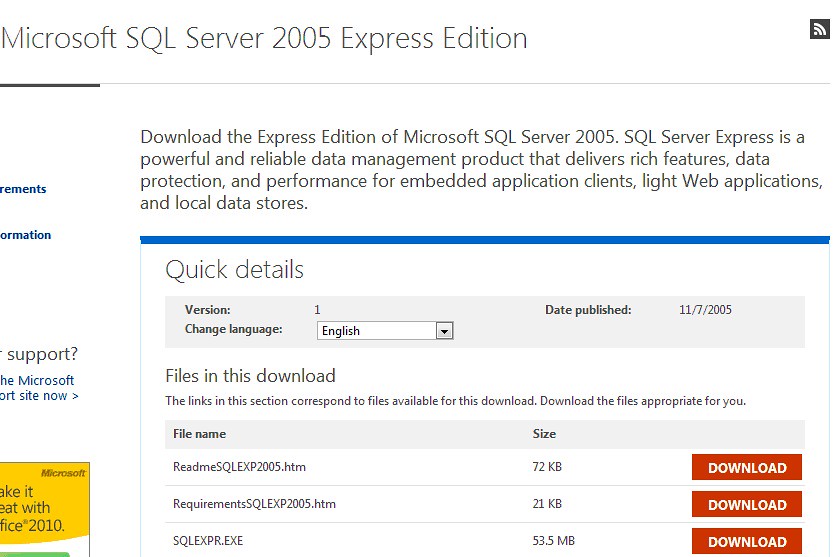
You’ll want to get the SQLEXPR.EXE file and run that.
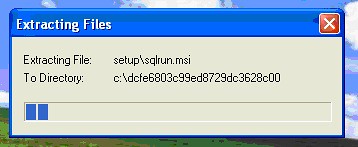
Accept the license agreement and walk through the install.

Once SQL Server Express is installed, you won’t have to do further configuration of it, in order to install dotnetnuke. Dotnetnuke will auto-create any databases it needs.
Installing dotnetnuke
Once you’ve taken care of the pre-requisites (as outlined above), you’ll be ready to install dotnetnuke. But take care! You DON’T want to install the latest version of dotnetnuke. You want to install an older version of it and the archives are a little hard to find.
So, navigate to http://dotnetnuke.codeplex.com/releases/view/20945 and download the “DotNetNuke_04.05.01_Install.zip” file located at http://dotnetnuke.codeplex.com/releases/view/20945#DownloadId=52880
This zip file contains all the files that make up DotNetNuke version 4.05.01, which is a version vulnerable to the remote file upload we’ll be exploring in later posts.
So, to begin, extract the contents of this zip file to a folder under the “wwwroot” folder located right below the “InetPub” folder on your machine.
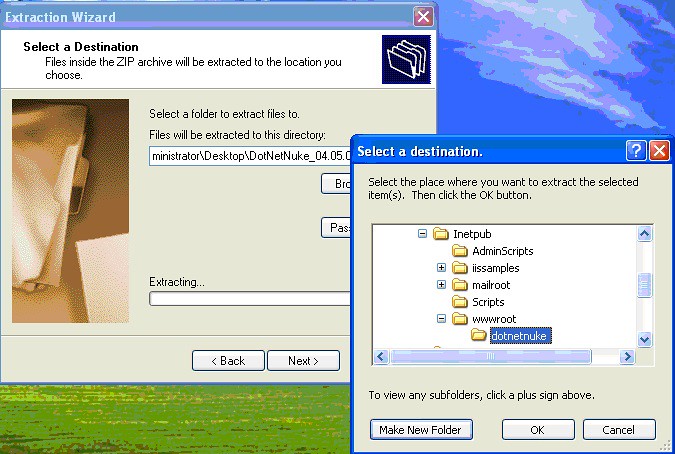
Once you’ve extracted it, you will need to set up a few permissions first. In the Windows XP world, you need to locate the “C:\inetpub\wwwroot\dotnetnuke” folder (or if you renamed it, whatever you renamed it) and right-click on the folder and go to “Security”.
You need to add the ASPNET user account to the permissions list and give it “Modify” permissions (or you can give it the “Full Control” permissions – hell, it’s a vulnerable machine).

You should also take the time to go into the “Advanced” button, select the ASP.NET Machine Account, check the box next to “Replace permission entries on all child objects” and click the “OK” button.

Next you’ll want to tell IIS (the web server) that you want to serve web pages from the dotnetnuke folder.
Configuring IIS to serve DotNetNuke
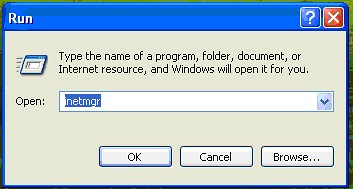
Run the IIS Manager console, by click on “Start”, then clicking on “Run” and typing in “inetmgr” and hitting enter.

Open the plus sign next to Web Sites and “Default Web Site”.
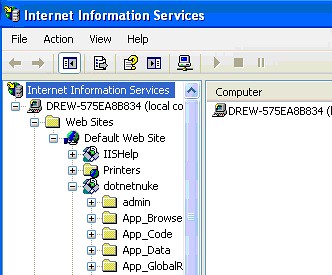
Right-click on “Default Web Site” and select “New” and then “Virtual Directory”. Make sure to set up the Virtual Directory the same as the illustration below:

And be sure that you give the “Application Name” a name in the “Application Settings” section (we set ours to dotnetnuke above). You should then see a Virtual Directory called “dotnetnuke” under your IIS Manager.
Click “OK” and once completed, you should be able to open a web browser to http://localhost/dotnetnuke
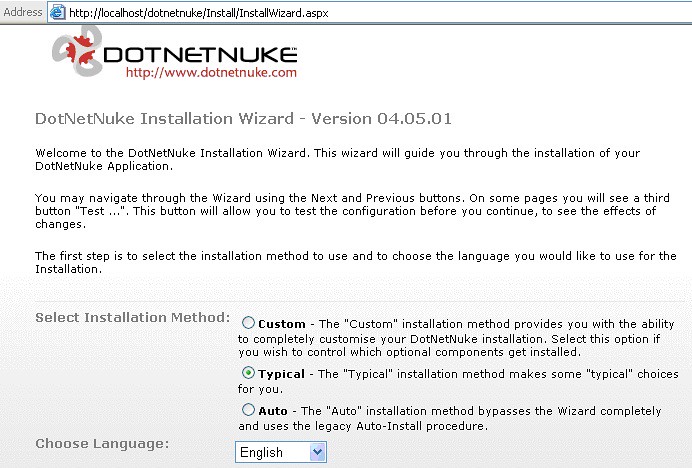
At this point, dotnetnuke will walk you through the installation wizard.
Configuring DotNetNuke
First, you’ll be presented with this screen. Select “Typical” and click “Next (in the bottom right-hand corner).
Then, the next screen will test that your permissions have been set up correctly. We did this a few steps back.
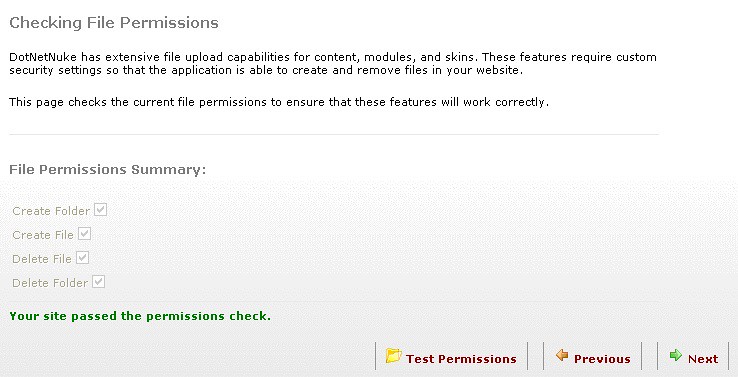
Click the “Test Permissions” link and when you get the green, click the “Next” link. At the next screen, you’ll set up your database. You won’t need to change anything from the screen below, if you installed SQL Server 2005 Express. If you didn’t, you can find other instructions here (http://www.dotnetnuke.com/Resources/Wiki/Page/Install_DotNetNuke.aspx) :
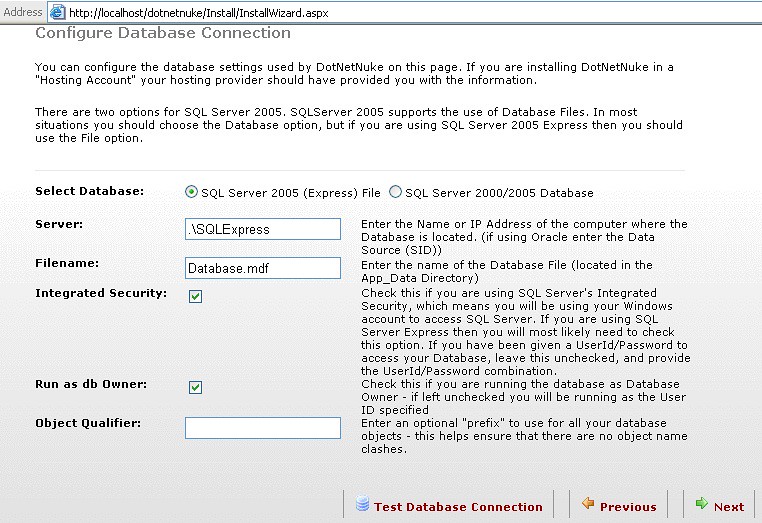
If you followed our SQL Express instructions above, then just take the defaults and click “Test Database Connection”. Once completed, click the “Next” button.

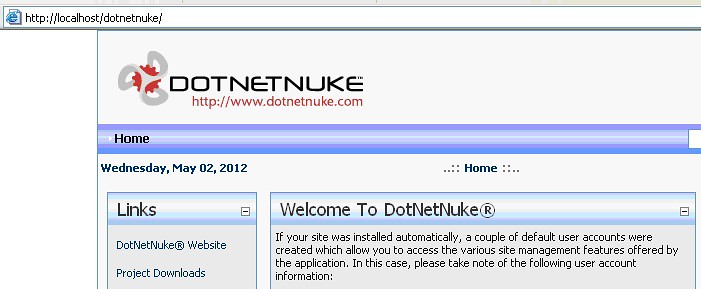
Once you see the following output, you’re all set. Select the link at the bottom right that brings you into the Application (dotnetnuke).

Congratulations! You’ve now installed dotnetnuke!
The last thing we need to do before exploitation is making sure the application answers external http requests. We’ll do that now.
Configuring DotNetNuke for External HTTP Requests
So, a little explanation before we move forward. DotNetNuke is now installed and if you were to browse from the XP machine, using http://localhost/dotnetnuke, you’ll be presented with the application. This is great. But one of the things we want to do is use our non-virtual host to launch attacks against the web application. We want to do this to give us a “real world” example of how to exploit remote file uploads. So, the last thing we need to do is make sure that when we open a web browser on our main (non-virtual) host, we can put in a URL with the IP address of our virtual machine and the web server responds.
Currently, this is not the case. So, we’ll need to set this up.
Do accomplish this, open a web browser on the XP machine and navigate to http://localhost/dotnetnuke. You’ll see the application.
Next, open a command window (DOS box) and type in “ipconfig” and hit enter.
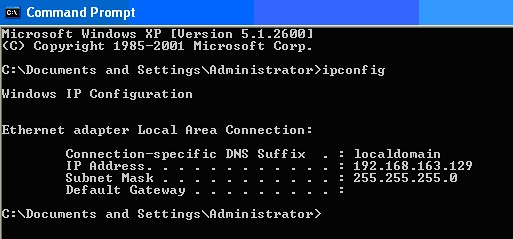
My NAT’d IP address is 192.168.163.129. When I’m on my host machine, I’ll be trying to access dotnetnuke by using http://192.168.163.129/dotnetnuke. However, we need to first tell DotNetNuke to answer to this IP address.
So, in the Web Browser, login using the username and password you were asked to set during setup. For instance, I log in as ‘host’ with my password.
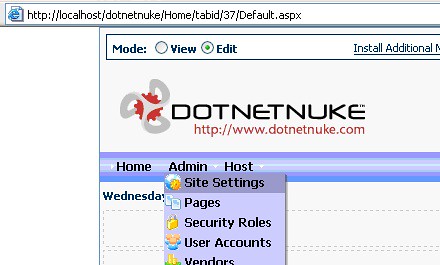
Once logged into dotnetnuke, you need to navigate to the Portals page. Click the “Admin” menu, then select “Site Settings” from the “Admin” menu:
In the “Portal Alias” section of the page, click the “Add New HTTP Alias” link to create an alias for the Portal.
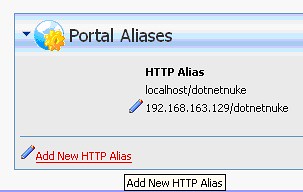
Here, you’ll want to put the IP address of your virtual machine and “/dotnetnuke” after, like so:

Click “Add New Alias” and you will have now enabled DotNetNuke to answer an external HTTP request, using the external non-virtual host.
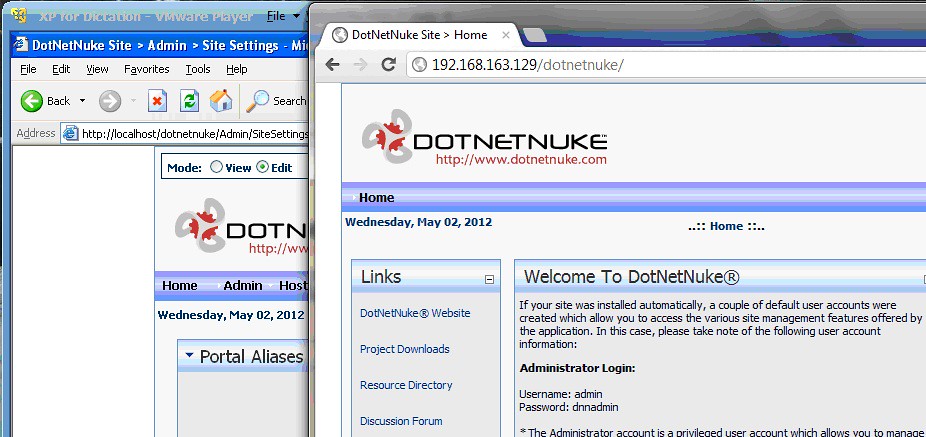
To prove this out, get on your non-virtual host, open a web browser and point it to the Portal Alias you just created.
That’s it!
Congratulations!
You’ve now got a virtual Windows XP host, serving dotnetnuke externally to your non-virtual host machine.
Conclusion
Next Tutorial, we’ll start to exploit this bad boy a bit.
Stay tuned!